Monday, July 24, 2006

Post 2 and a half: Breaking it down

Sorry for the delay on this post everyone! Blogger wouldn't let me upload pictures for the longest time, but now it's all figured out!

Now that you've all had a chance to look at the rough piece of animation, i'll go through how exactly i came to that point in the process. I mentioned that a turn-around is ideal to put behind you on your disc to flip from for refrence of model. I did up a quick turn around for anyone who wasn't sure what one was. I also did a quick version of a short hand drawing. This is a very useful device to employ when your roughing something out. It's a very loose version of the final design. It's just to get the expression in and block out the volumes. You can really burn through footage fast when you have a short hand version of your character to draw which brings me to my first point of roughing out a shot: LOOSEN UP!

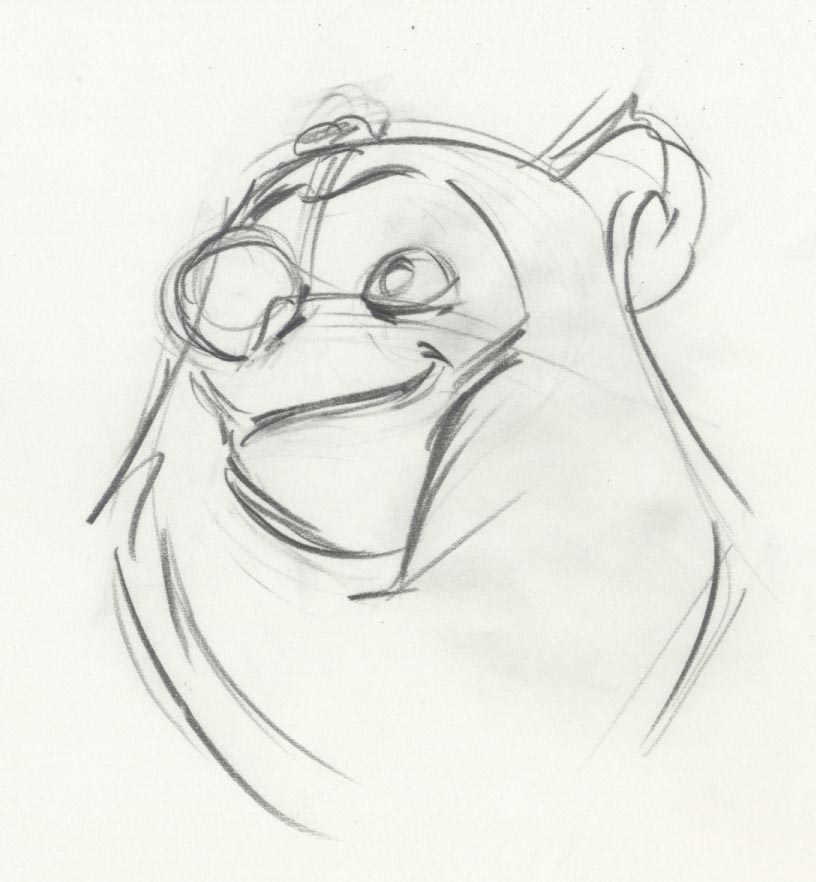
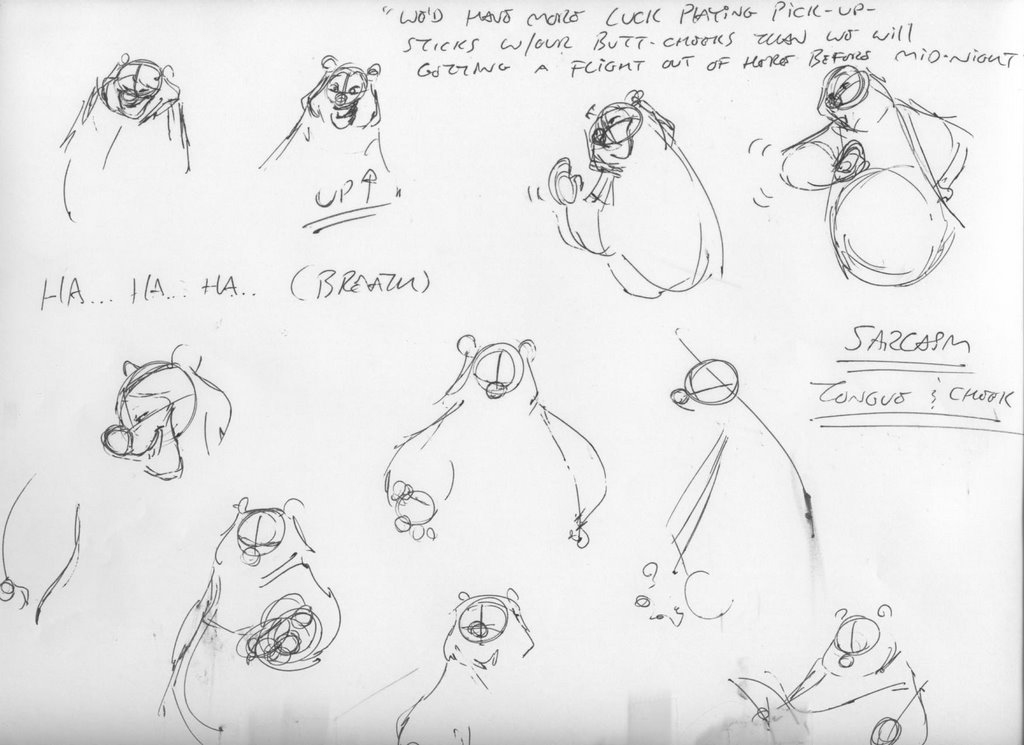
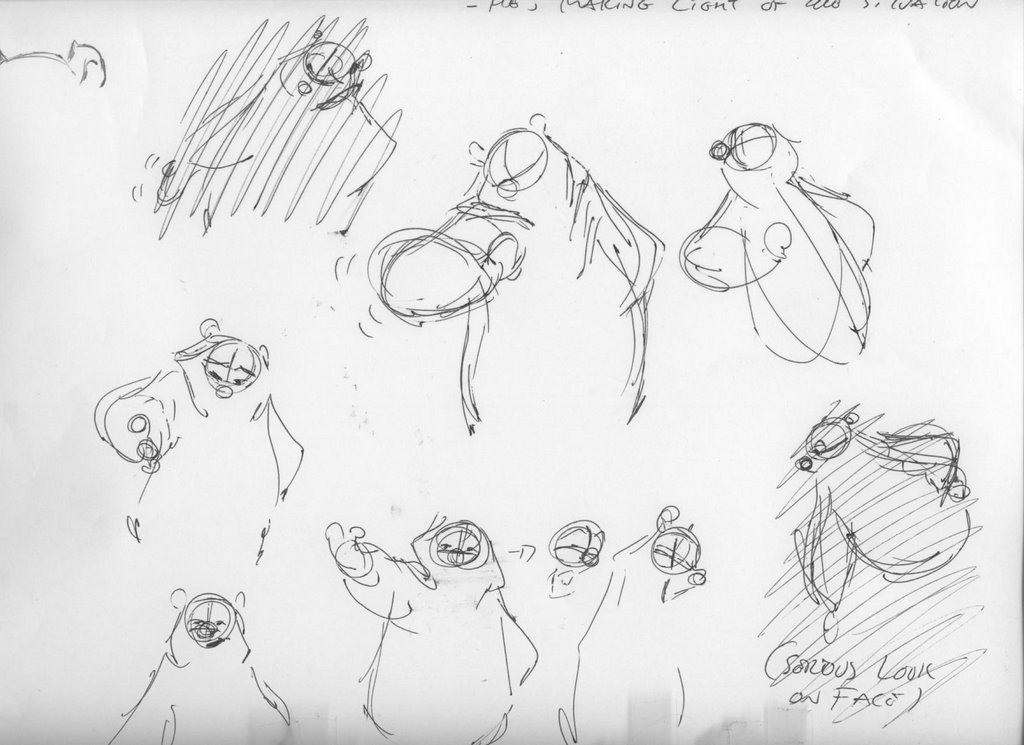
This is NOT the stage for making pretty drawings yet. Personally i think that roughs are quite beautiful when done well and with honesty. Here are things you should not be overly concerned with at this stage of the process: details like hair, nostrils, nuanced facial animation, eye darts, perfecting the dialogue, every single wrinkle in the clothing and every single inbetween. What you SHOULD be focusing on is: performance, gestural drawing, rhythm, consistant purportions, flow, and, you guessed it, performance!!! oh yeah, did i mention performance? It's important to think about your animation in a certain way. I believe this can some up what we do, animate feelings! Meaning, don't think "ok i gotta pick up the leg, move it here"--- naw naw naw, C'mon! animate feelings man! Yes, mechanics: spacing, arcs, on-model drawing contribute to good performance but they are merely a support FOR the performance. I personally feel this way, without great mechanics you can't communicate your great performance properly and yet if your animation is wonky because you don't understand good technique i think it could potentially pull someone out of the performance. Likewise a beautifully animated character from a technical stand-point only tickles the brain, not touch the heart. So while you need to be mindful to a degree at this stage of the process of techincal things, your main goal is making that funny little character breath and live. This is why most people work pretty rough at this stage-- I will admit that these ruffs of mine are a bit more complete than i usually do, but this time around it felt right. I work loosely because your first pass is like trying to capture the essence of the emotion of the scene. The essence of something is the core, all things shed off-- kinda like a quick sketch. 
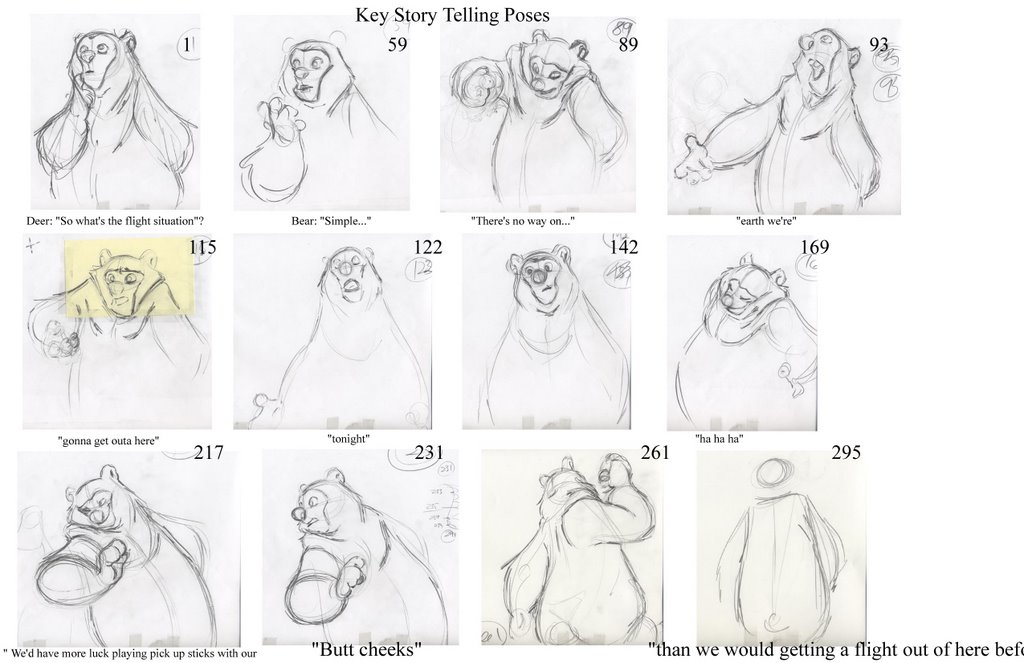
So, step one: Find your story-telling poses. This is always your first step. Finding those poses that will tell the audience what your character is thinking and feeling. You should have done this to a degree already in your thumbnailing process, but everyone works differently and there's no telling how you'll come to that final pose. Sometimes i thumbnail everything out, and then spontinaeously i find something better as i'm roughing it out and then don't even use my thumbnails. Or sometimes I just stick exactly to what i thumbnailed. it's always different. So, i guess the point in all that is to allow for spontinaeous moments but also it's wise to have a pretty clear idea of what your shot is to be eventually. Make sense? How you get there can and will change from shot to shot.
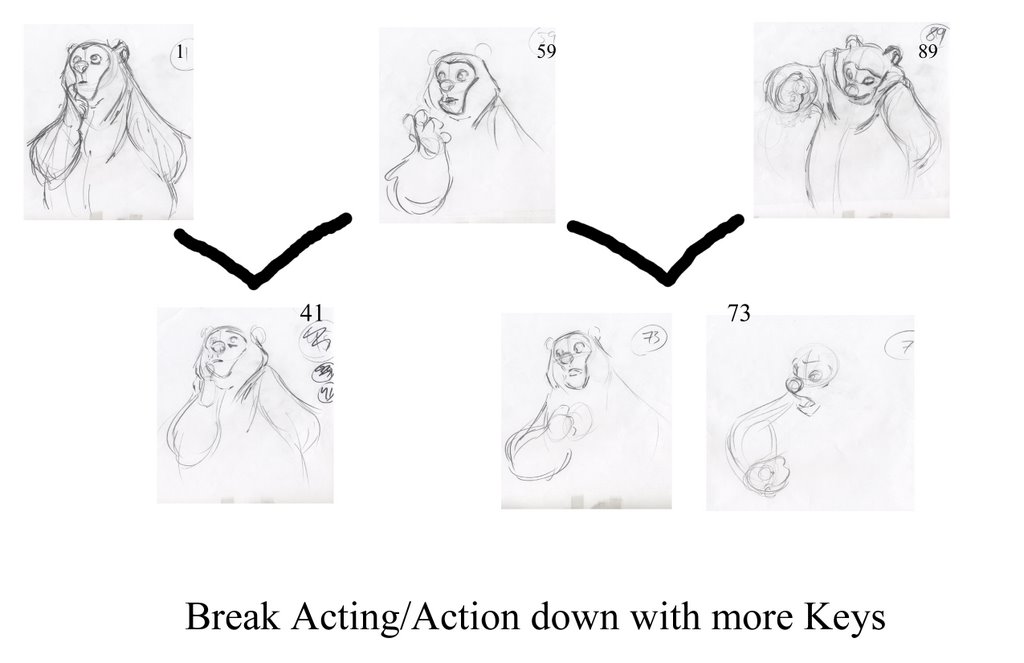
So basically you have your rough poses... and as you can see in the pics they are pretty far apart time wise:frm 1 to frm 59. I call these anchor drawings... they are starting and stopping points, but a lot needs to happen inbetween them. For example, from 1 to 59 the character is just listening to another character say "So what's the flight situation". I have a lot planned for this but i will not execute it untill tie down. Things like breathing, looking around and such. The main thing is to not draw too much attention to himself just yet-- whenever another character is talking and in the same frame (as there will be eventually hence the nudge pose at the end of the shot) you keep the other character "alive" but subdued. I really like using eye darts and breathing for thinking (which you won't see until tie-down). That's all this character is doing at this point, he's thinking about their situation. Thus he hits a brewing point and at frm. 59 lets out the word "simple".
Something else i look for is when an actor takes breath's in their performance, i know i mentioned it for thinking moments but i just plain like it in performances too. It helps give you the sense that the character is alive. It's easy to over-do so you gotta be careful with how much you use it but i like to try and build them into the performances on a consistant basis.
So you hit up all your main story telling keys, roughly time them and then move on to filling it all out a bit.


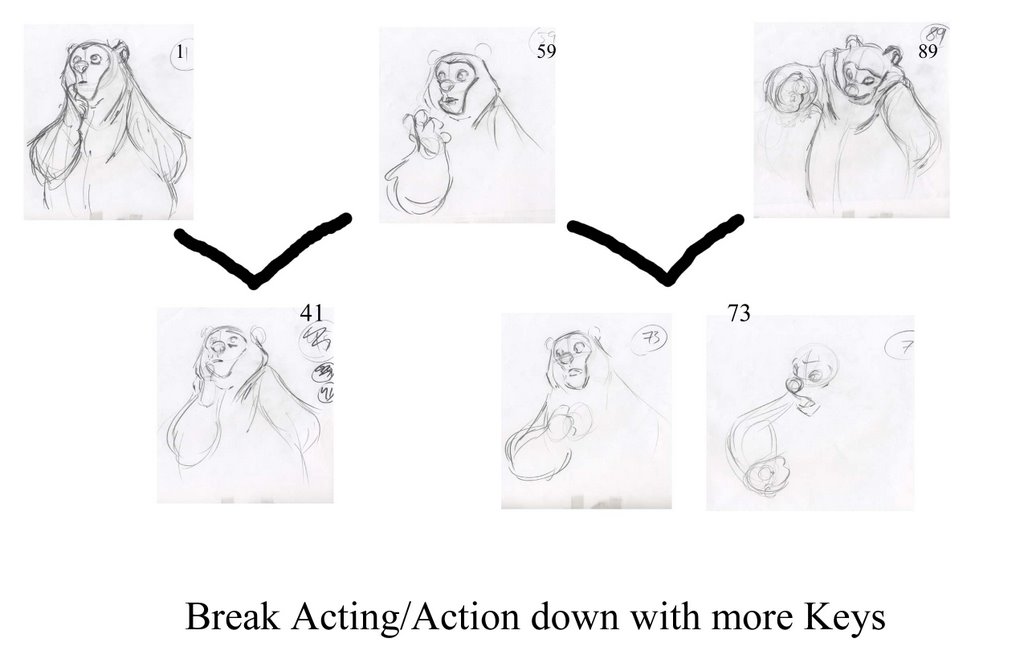
The next step is to break down your anchor keys with some other keys. This is where you build in arcs, breathing, extra thinking poses, head turns. Basically flesh it out-- you really need to be planning ahead for what your eventually going to tie down. Ultimately it's the performance your after but if something is so indecernable (a.k.a so stinking rough and off-model) that you are having an impossible time tying it down maybe you ought to complete your ruffs a little more before you go to tie down. everyones different of course, but i know I've learned a lot from this phrase "Value your ruffs". It's a Glen Keane term not surprisingly-- Some animators treat their ruffs as a means to an end... no no no no, ruffs are an art unto themselves! why do you thinkeveryone loves a good Glen Keane ruff... it's his heart and soul that's why! I digress!

So basically all your doing from here on out the end of the first pass is fleshing things out a bit. You dont want to waiste your time on details that don't matter yet, but you do want to give enough information to tell your director what the shot will eventually look like.

Incidentally, the sooner you can get some numbers going on your animation (i.e timing) the better!

Okee doke peoples! That's it for now-- i do plan on taking a little break from this online teaching stuff for a little bit since it's gonna take me a long time to tie this stuff down on top of work and stuff. So, i might post here and there about some other stuff but rest assured i will finish this series. Looking forward to completing it! take it easy!

Wednesday, July 19, 2006

Post 2: ROUGH IT OUT


hand drawn animation - video powered by Metacafe

Before i forget i DID NOT DEISGN THIS CHARACTER. This is Steven MaCleods of www.clockroom.blogspot.com. This character is from HIS film from CalArts this year. It's one of those designs that just roll off your pencil, really wonderful shapes! i love him Steve!

Here it finally is! In the next couple days i will go through it piece by piece and breakdown exactly how i approached this rough stage. Remember everyone, this is just a rough. There's a LOT tweeking that has to happen from here (mainly pulling things back a bit), this is just your heart and soul on the paper. the next step is refining it all in tie down. but look for my next post where i will break it all down for everyone. enjoy!

Monday, July 17, 2006

Step 1 and a half: Before you rough out your shot (Tips and Tricks)

Welp, here we are again on the second post of the "animate your own shot" saga! This post will mainly be a sorta of common sense kind of lesson. There are some helpful Tips and Tricks that i employ while getting ready to animate a shot. and by the way, these are in no particular order. OK! you've got your road map, you've got your conviction and your gusto, and a lot of coffee! your almost ready to start your amazing shot that young and old will admire for centuries to come! The very first thing i do AFTER conception of a shot (this sounds like Health Ed), is write up your X-Sheet. Richard Williams does a fine job of explaining this in his book, but using your X-Sheet is a great way to think through your timing. Sometimes you want to do funny little hand gestures ontop of your main pose and aren't sure if the hand will settle in enough time for your main pose to read, this is where you start to gestimate whether it'll work or not. It's hit and miss. The more you animate the more your know what'll work and what won't. And also, number your X-sheet all the way to the end on the odd numbers: 1, 3, 5, 7, 9, etc... I've had animators tell me that at ALL cost keep things on odd numbers. This never made complete sense to me, what they meant is "if you keep it on odd's then you can keep it all on 2's and make less work for yourself". As long as that works for your scene fine, but if something needs to be keyed out on 3's just do the work! If you don't want to work hard why are you in animation for heavens sake? but also more practically if you plan things on 2's and they stay on 2's it's easy to throw things on 1's without having to renumber like made. Plus, it's easier to find where your at in the shot if you have a problem arising. Your drawing number IS the frame number on this system and makes things easier on everyone.


Another tip for ya is to blow up or down a xerox of the model sheet to match the size of the character your animating and tape it to the top of your disc (as shown in pic above) so all you have to do is flip to the back to check on how your drawing the model (a turn around is ideal). Trust me, no matter how big or how small your shot is DO THIS! There is a great story i heard from animator Derek Thompson. He worked at DreamWorks on Prince of Eygpt... one day he walked into James Baxters office and started small talking and asked him how he got his work "so solid". James didn't say a word, stood up, walked down the hall to the xerox machine, tapped on it as if to say "like this" and walked back into his office. All with a smile on his face. He meant that he uses the xerox machine in ways like this to maintain the model. If James finds it useful, i think WE ALL need to be doing this.
Also, and this is a matter of opinion, do turn off your music, radio, dvd, whatever it is. I LOVE to "watch" or listen to movies while i work. I do it all the time, but NOT while i am doing my first pass. Your first pass is really your heart and your soul and if your like most you need concentration to find the scene somewhere inside you. It may not be the prettiest version of your scene, but it sometimes is the most honest. Personally when i know the shot is working acting wise, i put on a film that helps me zone out but not until i have it.
I know this post must seem slightly boring and thin compared to the last, but this is just a simple tips and tricks post. The NEXT post (in 2 days!) you get to actually see what the roughed out shot looks like and i'll talk about how i approached it. Until then be thinking about questions you might have and i'd be happy to answer them!

Wednesday, July 12, 2006

Teaching at CalArts

Phewwwwww- these 2 free-lance gigs are killing me man! Am thankful for the work but sheesh, i need a little me time know what i'm sayin'? This post is mainly for my CalArts students... I just wanted to let you all know how much fun i had last semester, it truly was MY pleasure to get nerdy about animation with you guys. But alas, teaching first year was not to be for me this coming semester. Mike Ngyuen will be returning to teach 1st year so Cynthia asked me if i'd be willing to step aside............... AND TEACH 2ND YEAR BABY! Oh yeah, we get to nerd out for a whole other year! And boy do i have some RAD RAD assignments for you guys! You guys are gonna get your brains so swelled with animation goodness that all you'll be able to do is respond to people in animation terms. "so how long will you be gone for? Ohhhhh, about 3000 frames" or, "Could you reach that for me? Sure, let me time it out on my X sheet first. Let's see, anticipate, squash down, stretch up, delay arms...
But seriously folks, it's gonna be RAD! Be looking for the next post on the "How to do a flippin' cool shot" serious. I am gonna cover a little more practical tips and tricks in what you do right before you start animating next. stay tuned!

Thursday, July 06, 2006

Step 1: Planning your Shot

Soooo, the long awaited "Start to finish" series of posts has officially begun! I am sorry for the time it has taken, but i have been gone, am working 2 freelance gigs (and am thankful for the work), and plainly i wanted to make sure this was as good a post as it could be. So i've put a lot of thought into it!
Let me start this post out with the comment that this is only ONE way of animating. there are as many ways of animating a shot as there are animators! So, find what works best for you and then modify it. The wonderful thing about art and animation is that it is so very personal-- make it your own! I can't say that i use even my own methods all the time. Sometimes certain scenes are very simple shots that don't need elaborate planning. I am doing a 30 frame shot for a commercial right now-- very very simple, i didn't even thumbnail it. However, i find when a shot is "lengthyer" and more specifically offers certain acting/staging challenges I NEED to explore on paper. but before any thumbnailing happens i am going to tell you to do something that a Production Manager would HATE me for, but here it is: THINK! The last thing you should do when starting a new shot is pick up your pencil. You HAVE to internalize what you are about to execute. If you can't do either one of these things you're scene will not be successful.
A: Visualize
B: Internailze
Ollie Johnston has been qouted as saying "If you can't see it, you won't be able to draw it. I believe that seeing it and feeling it (internalizing it) are related but not necessarily the same. I think they are related in that if you can't feel it, then you won't be able to invision it clearly in your head. So, think about your scene. Ask questions: who is he what's his personality, where does this shot take place in the arc of the story, who did he just talk to and what was the last emotion he/she felt, what's the arc of the scene, where's the entertainment value in this shot. BE RUTHLESS with yourselves in your exploration... if you find yourselves slavishly applying Preston Blair formulas to your shots then your scene is already dead. Yes, sometimes books like that help with technical things but right now i'm talking about conception of a shot! Get OUT of your studio, take a walk, ride your bike, read, whatever inspires you!
I personally like to take walks and really think through my shots... by the time i'm done with my walk i am ready to start writting down some ideas. Also, this is a great time for research. Now this i will say with no apollogy... everyone needs to research. I don't care who you are but so much comes from studying and researching that you couldn't possibly have brought to it any other way.
So to sum it all up-- get juiced up and excited about what your gonna do. I know that i cannot animate something unless i believe in it wholeheartedly! Have the guts to challenge and idea you think is weak (with grace of course) and be willing to be wrong. that's the big one, throw your pride out the window man! I learned that one the hard way!
So... now that you've though all about your shot and have conviction and just KNOW that your scene is going to be revered through the anals of time you can begin to plan and thumbnail! Ideally before you start thumnailing or even thinking about your shot you should have your dialogue memorized. All of the ups and downs... where the accents are. KNow it in and out. What i start doing at this point is finding some gestures that tell the main key points of the scene. It doesn't have to be many poses, in fact it's usually better when you simplify. Tony DeRosa's main comment on most of my animation has been to simplify it-- so start scribbling and finding those gestures that explain what the character is feeling and thinking.
Here are some pages of thumbnails i did for the shot i will be animating. It is here where you find your gesture, plan your staging, write down ideas... let it all out. Try things that are outrageous-- you never know where your thoughts might carry you. Oh, and don't worry about making pretty drawings-- these are just thoughts, i use stick figures a lot when i am thumbnailing. Especially when i don't know the character too well yet.
The line of Dialogue reads: Deer:"So whats the flight situation?" Bear: "Simple (pause)... there's no way on earth we're getting out of here tonight(pause and laughs). we'd have more luck playing pick up sticks with our butt cheeks that we would getting a flight out of here before midnight" ( i tried posting the dialogue put could not)


I mean come on, look at these drawings! they suck! They're not meant to be pretty, they are meant to be honest. I think sometimes it can be a downfall of animators to mistakes nice poses for "thinking". I've done it for sure-- certainly poses can evoke thinking, but i really feel like think is shown mainly in change. i.e A character is in a situation where he is being asked to make a difficult decision. He is tense, shoulders up, chest inflated, brows down-- he realized he needs to make a certain decision and is at ease with it. He relaxes his shoulders and exhales and lifts his brows. There is not a huge pose change in there, just a change of shape that shows us his thinking. You are working within a pose with something like this-- now sometimes you want to have some sort of change of line of action to make your idea clear it's just knowing where to do it. I am only skipping around these topics because i will cover more once we get into the animating portion of the posts (the FUN part).

I hope that's a fine start for everyone! Please please feel free to ask question if you have them either e-mail me or just post it and i'll reply. So get excited, get inspired and have fun everyone!